Python Implementation of an MCP Server for Online PPT Generation Based on Slidev
Preface
Since the emergence of ChatGPT in December 2022, we have witnessed the advancement of AI technology while also pondering a crucial question:
How can we leverage AI to reduce our working hours and enhance our efficiency?
Web-based large models that interact solely through natural language clearly have limited capabilities. At this very moment, AI Agent technology, built upon large models, offers more possibilities for addressing the above question.
Creating PPTs is a common task for many, whether engineers or scholars—everyone needs to prepare a PPT to report their work or present their ideas. Have you ever considered this: How can we focus solely on the content of the PPT and let AI handle the rest—such as styling, font size, and other laborious tasks unrelated to content?
Relying solely on web-based large models is obviously insufficient, as they can only output text. There are also many AI PPT products on the market, such as Gamma, WPS AI, MindShow, etc. However, these products have not gained widespread adoption, and certain operational barriers undoubtedly become the "last mile" blocking users from accessing great features. But now, with large models that can interact entirely through natural language, can we explore new possibilities?
The answer is yes. This article will demonstrate how to develop an MCP that assists in Slidev PPT development and use OpenMCP to validate and test functional modules. Once tested, the MCP can be loaded as a plugin into any MCP client, instantly becoming an AI Agent that automatically generates online PPTs viewable in a web browser based on an outline.
Environment Setup
To follow this article, you need to prepare the following development environment:
- Python 3.10 or above
- Node.js 18.0.0 or above
- VSCode or Trae or Cursor
- Install the OpenMCP plugin
The code for this article is available at: https://github.com/LSTM-Kirigaya/slidev-mcp
What is Slidev?
Slidev is a modern, open-source slide creation tool designed for developers, based on Markdown and Vue.js. It aims to enable users to create highly customizable and interactive presentations through simple text syntax. Before proceeding, I want to guide you through trying Slidev to build a basic understanding. This will make the logic clearer when we later construct an intelligent agent to automatically build PPTs.
Starting a Super Simple Online PPT
First, open the command line and install Slidev:
npm i -g @slidev/cliAfter installation, create your first Slidev PPT. Using the example from the Slidev official website, create demo.md and fill it with the following content:
# Title

Hello, **Slidev**!

---

# Slide 2

Use code blocks to highlight code:

```ts
console.log('Hello, World!')
```
Then, start Slidev to see the effect. Enter the following in the command line:
slidev demo.mdThis command treats demo.md as the entry file for the Slidev slides and performs compilation and rendering. After execution, the command line will output something like:
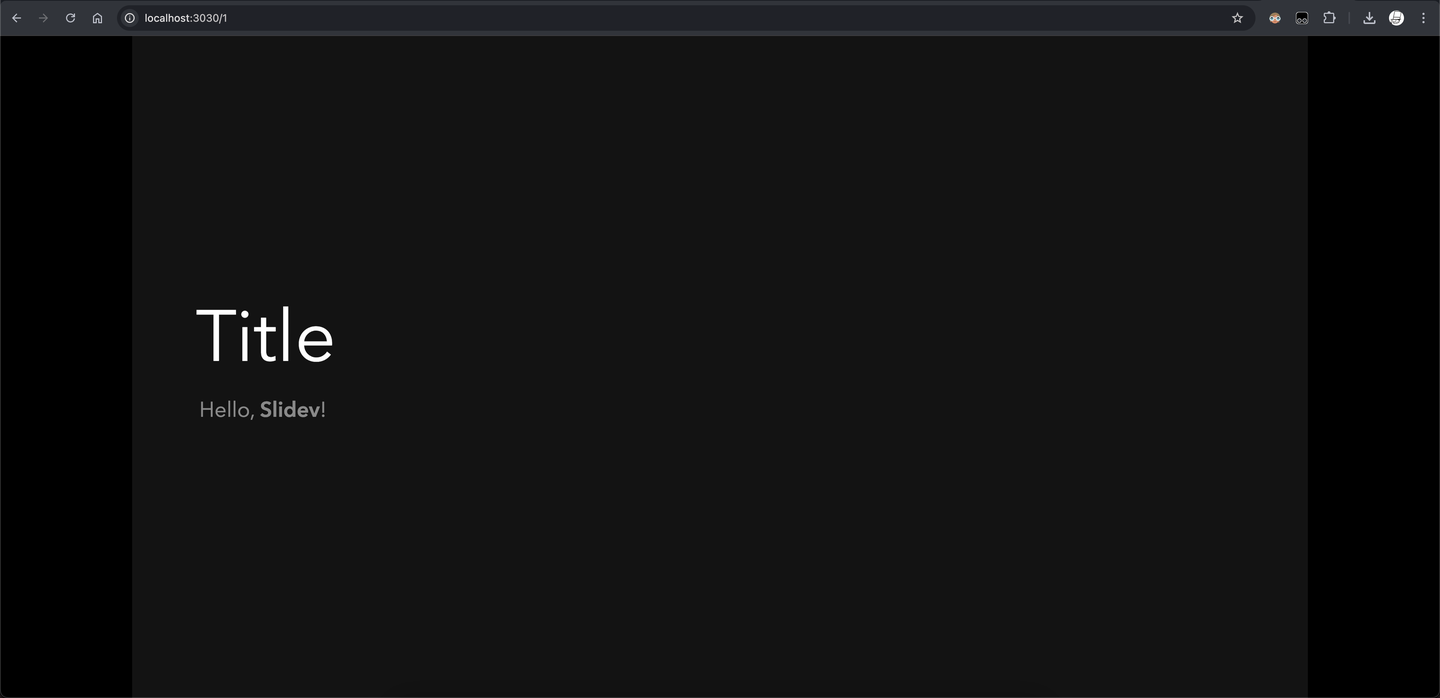
public slide show > http://localhost:3030/Copy http://localhost:3030/, open your browser, paste it into the address bar, and press Enter. You will see the rendered PPT:

Move the cursor to the bottom left corner to see a hidden toolbar where you can switch theme colors, enter full screen, or view the grid window. Press the left and right arrow keys to switch between different slides.
Adding Transition Animations
From the above example, you can see that Slidev uses the --- separator to define different pages. --- signifies a new page, similar to \newpage in LaTeX.
In fact, besides ---, Slidev also supports using frontmatter as a separator, for example:
---
value1: key1
value2: key2
---
Here, we define the properties of the current slide using this special syntax unit called frontmatter. Slidev provides many built-in properties. For instance, we can set transition: slide-left to define the entrance animation for this PPT page.
---
transition: slide-left
---
# Title

Hello, **Slidev**!

---
transition: slide-left
---

# Slide 2

Use code blocks to highlight code:

```ts
console.log('Hello, World!')
```
The effect is as follows:

Additionally, Slidev offers a plethora of other features and characteristics, all requiring the specification of various styles and frontmatter. These can all be found in their official documentation.
At this point, I know you might feel like giving up. Don’t rush! I also find Slidev quite cumbersome to use, which is the purpose of this article. The examples I listed above are not meant to teach you how to use Slidev but to visually demonstrate that using Slidev is not simple, thereby establishing the logical "correctness" for developing a Slidev Agent.
Writing the Slidev MCP
Writing Slidev Is Really Troublesome
From the previous demonstration, you can see that with simple Markdown, we can create clean and elegant PPTs. However, due to its high learning curve, the tediousness of writing medium to long PPTs, and the excessive mental burden on Slidev writers, Slidev has not been widely adopted.
If you actually followed the steps above, clicked into the official documentation, and saw a lot of complicated HTML, feeling the urge to give up, then you can certainly understand what I intend to do.
Directly Generating Slidev with Large Models
Before we officially begin, some might ask: Since Slidev is also plain text, why not let the large model generate it directly? There are several reasons:
- Slidev uses special Markdown syntax that large models are not familiar with, leading to poor generation results.
- Slidev uses
---to define multiple PPT pages. Asking the large model to regenerate each page every time is not only inefficient but also increases the probability of errors due to the expanded generation scope.
Interested readers can test the effect by inputting the same problem into a large model after reading this article. Directly using large models cannot solve our problem, so we have to write an Agent to optimize this process.
Writing Our Slidev Agent
Alright, we are ready to start writing our Slidev Agent to automatically create PPTs. For those lacking knowledge about AI Agents and MCP basics, I strongly recommend reading my previous blogs:
- The Three Core Components of AI Agent & Current Shortcomings
- Agent Era Infrastructure | Introduction to the MCP Protocol
Step 1: Determine the Basic Agent Skills
The first step in writing an AI Agent is to determine what basic skills our agent possesses.
Based on our experience in developing Slidev, we can summarize the following basic skills (or steps):
- Check if Node.js and Slidev CLI are installed and ready (install automatically if not)
- Create a new Slidev project (requires user input for title and author information)
- Load an existing Slidev project
- Create/update the cover page (supports custom templates and background images)
- Add new slide pages (supports multiple layouts and content formats)
- Modify existing slide content
- Retrieve specific slide content
Step 2: Implement Basic Skills
We implement the basic skills of the Agent through MCP tools. Open VSCode or another code editor and first implement the above skills in Python.
Note that we use global variables to save the current state of the Slidev PPT, such as how many pages there are and what the content of each page is.
Here, we need to write corresponding tools based on our knowledge of Slidev. For example, the code for a normal Slidev page might look like:
---
layout: default
transition: slide-left
---

## Hello World !
Then, to reduce the user’s cognitive load, I decided to set all transition animations transition to slide-left, and let the AI decide the layout. Assuming you have determined such a demand pattern, the Python string template for the above example would be:
template = f"""
---
layout: {layout}
transition: slide-left
---

{content}
"""
Here, layout is "default", and content is ## Hello World !. Of course, these interfaces are reserved for the large model to generate.
Thus, the MCP tool for adding a PPT page can be written as:
@mcp.tool(
    description='Add new page.'
)
def add_page(content: str, layout: str = "default") -> SlidevResult:
    global SLIDEV_CONTENT

    if not ACTIVE_SLIDEV_PROJECT:
        return SlidevResult(False, "No active Slidev project. Please create or load one first.")

    template = f"""
---
layout: {layout}
transition: slide-left
---

{content}

""".strip()

    SLIDEV_CONTENT.append(template)
    page_index = len(SLIDEV_CONTENT) - 1
    save_slidev_content()

    return SlidevResult(True, f"Page added at index {page_index}", page_index)
Here’s a simple tip: There are a few basic guidelines for setting these interfaces:
- Functions should尽量避免设置复杂数据结构作为参数,参数最好就设置成字符串或者数字。
- Ensure that the parameters filled in are things the large model is likely to know. For example, the above fills in Slidev layout characters and text content. The text content is Markdown generated based on context, which we assume the large model knows. The following MCP tool is a counterexample:python
# Wrong example: because the large model does not know the latest Windows activation code
@mcp.tool(description='Activate Windows')
def activate_windows(activation_code: str):
    winapi.activate(activation_code)
Knowing the basic logic above, you can write the final code. The complete code is at https://github.com/LSTM-Kirigaya/slidev-mcp/blob/main/tutorial/step1.py
Step 3: Test the MCP Tool Flow
To test whether our written MCP tools are error-free and achieve the basic effect, it is necessary to conduct two rounds of basic testing on the MCP.
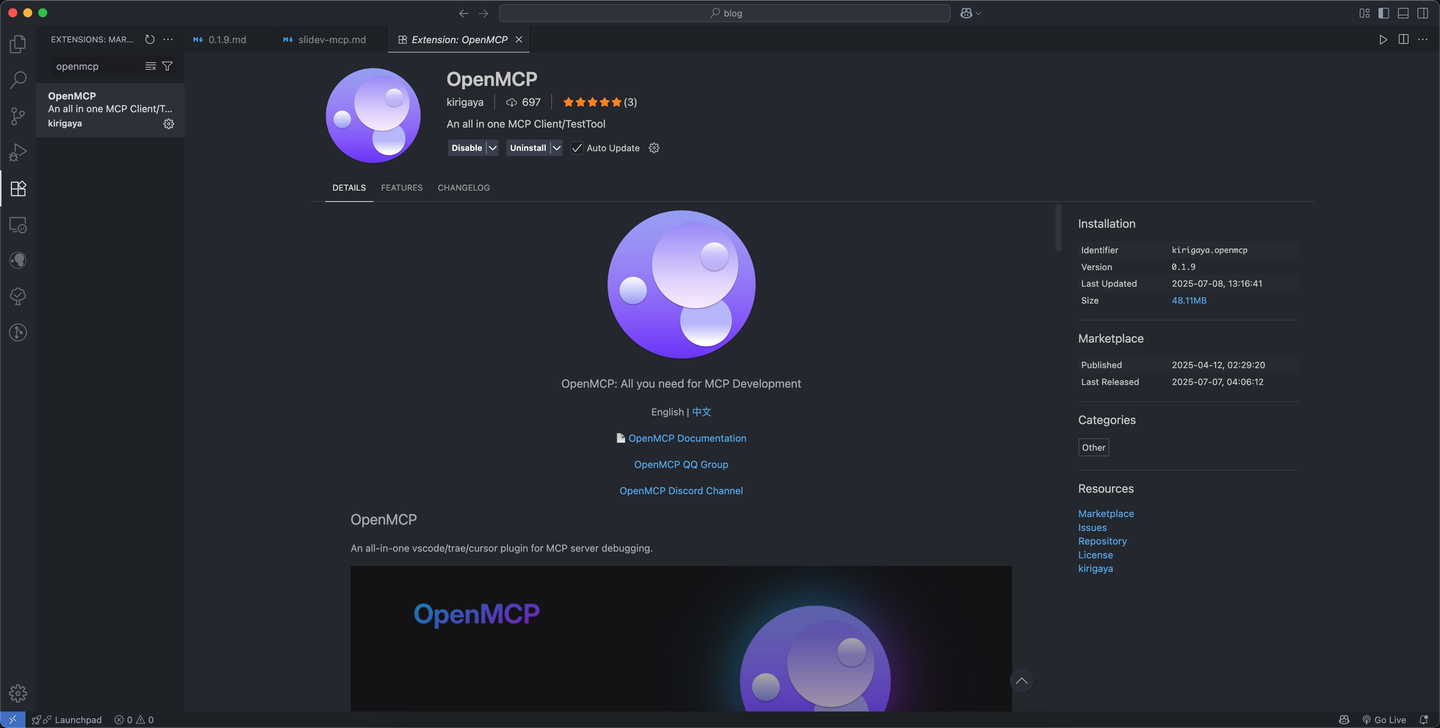
The first round is basic tool testing, aimed at detecting whether there are runtime errors in the MCP tools. First, click on the VSCode application store and search for OpenMCP.

Click to download. Then, enter the Python file we just wrote, click the OpenMCP icon in the upper right corner to enter the OpenMCP debugging editor. A basic guide interface will appear during initialization; just follow it carefully.
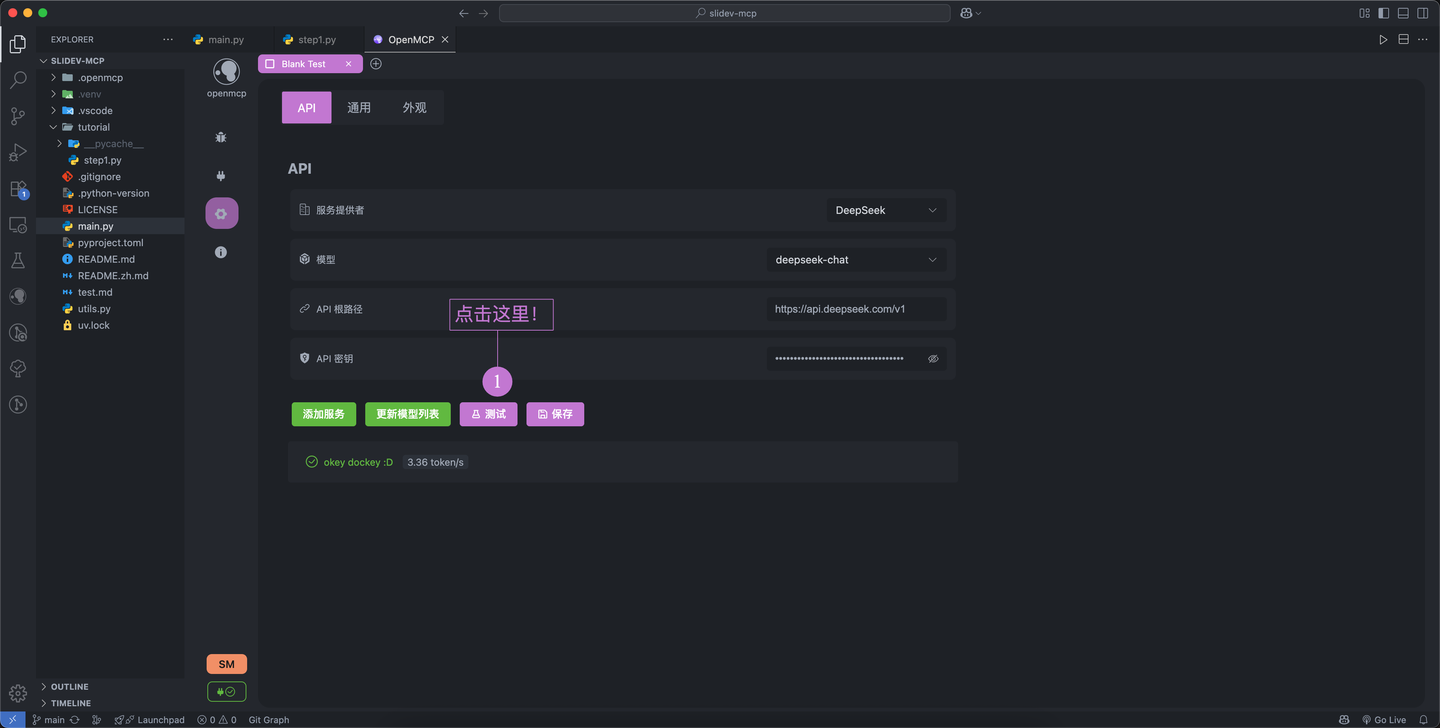
After entering the editor, first configure the large model API. I use DeepSeek's API here. Fill in the API token and click save. Friends without an API token can register and obtain one at the DeepSeek Open Platform. New users默认拥有20块钱的额度. After obtaining the DeepSeek API token, fill the token into the large model configuration section of OpenMCP and click save.
Click Test again. If the result shown in the figure below appears, it means your large model can now be used directly.

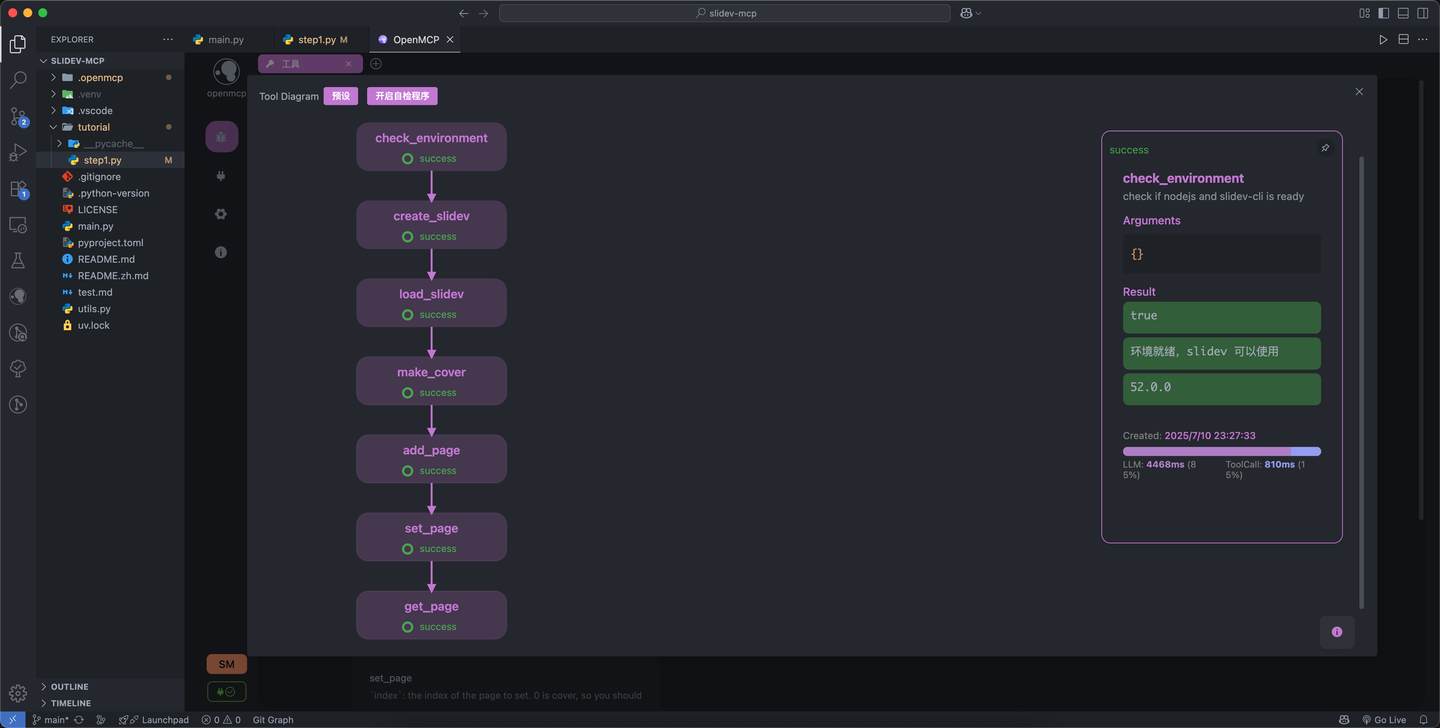
Then, click the top "Blank Test", click "Tools" in the center of the screen, and you can see all the MCP tools we defined. To quickly test whether our tools have runtime problems, you can click "Tool Self-Check" on the right side of the "Tool Module". A window will pop up showing the scheduling order we set.
Note here! The MCP tools we write generally have a certain scheduling order. For example, in the Slidev-MCP we developed, the large model must first call create_slidev or load_slidev before it can perform subsequent operations. In the default generated scheduling diagram, this order is correct. However, if readers develop other MCPs in the future, the order of MCP tools may not be correctly arranged. At this time, the topology structure needs to be manually adjusted. For the use of this part, please watch the OpenMCP 0.1.9 video explanation: https://www.bilibili.com/video/BV1YpGHzcEs4
After preparation, click "Start Self-Check Program" above and click "OK". After a short wait, OpenMCP will automatically complete the inspection of all tools. When the result shown in the figure below appears, all showing the word "success", the test is successful:

This step is very useful in the early stages of MCP development. It can effectively reduce the probability of problems during subsequent interactive testing, thus saving time.
Step 4: Interactive Testing of MCP
After the self-check program is completed, it means your MCP tools are没问题了. At this time, you can directly test in "Interactive Testing" how effective the Agent assembled by our MCP接入大模型 is!
We create a new blank test and select "Interactive Testing". At this time, you will enter a familiar dialog box, which is no different from the large model you usually use. Through this function, we can test the effect of the agent we developed without installing the MCP.
We paste a事先准备好的演讲提纲 into the dialog box.
You can directly throw any large text to the large model and let it generate an outline like this. This involves a project called crawl4ai that can convert website links into Markdown. I won’t go into details here. There is a corresponding MCP for crawl4ai online. You can load it as an additional server into OpenMCP. The tutorial for connecting multiple servers in OpenMCP can be found here.
# 讲演提纲:从大模型的幻觉现象剖析开发 AI Agent 的技术瓶颈和解决思路

## 封面页
- **标题**:从大模型的幻觉现象剖析开发 AI Agent 的技术瓶颈和解决思路|到底谁的幻觉更大?
- **作者**:锦恢 (LSTM-Kirigaya)
- **背景图**:使用文章中的首张配图([链接](https://linux.do/uploads/default/original/4X/4/c/3/4c34eab8281f0d6215f2ea4139df019dcfc7212d.webp))
- **副标题**:探讨 AI Agent 开发中的核心挑战与解决之道

---

## 1. 前言
- **讲演者背景**:
  - Blender MCP 开发者
  - OpenMCP 项目作者
- **核心问题**:
  - AI 领域 Demo 多但实用产品少
  - 两大关键问题:
    1. 大模型的幻觉
    2. 开发者的幻觉

---

## 2. 大模型的幻觉
### 定义
- 大模型不知道自己不知道什么,遇到未知问题时会胡编乱造。
- 核心表现:
  - 盲目假设(如数据库查询案例)
  - 虚构答案

### 案例展示
- **问题场景**:开发数据库查询 MCP 工具
- **现象**:
  - AI 回复“我不知道”,但工具实际支持查询
  - 错误调用过程:
    - 直接使用 `Comment` 类型查询
    - 未先确认“评论对应的节点类型”
- **配图**:
  - [错误回复截图](https://linux.do/uploads/default/original/4X/2/0/1/2019c1c00096d36d9c6c5a2d229e78726e9009df.png)
  - [错误调用过程截图](https://linux.do/uploads/default/original/4X/2/4/b/24baa4fb174e2dea422a59850bd420b57ca44fdc.png)

---

## 3. 解决大模型幻觉的方法
### 前提条件
- 明确 **应用场景** 和 **设计边界**:
  - AI Agent 能做什么?不能做什么?

### 具体方法
1. **系统提示词**:
   - 明确告知 AI 能力边界
   - 提供清晰的指令模板
2. **MCP 工具原子化拓展**:
   - 细化查询能力(如先查询“评论节点类型”)

### 效果展示
- **优化后结果**:
  - AI 正确识别节点类型
  - 返回结构化数据
- **配图**:
  - [优化结果截图](https://linux.do/uploads/default/original/4X/2/4/7/247aa5b0ff8adc857f1f3a57cb4351989a6b5954.jpeg)

---

## 4. 开发者的幻觉
### 核心问题
- 开发者对大模型能力边界的不切实际期望
- **现实背景**:
  - Pretrain Scaling Law 已接近极限
  - 大模型能力边界逐渐清晰

### 具体表现
- 在不适合的领域强行开发 AI Agent
- 失败后归咎于“大模型太垃圾”
- 忽视设计边界和方法论

### 警示
- 开发者需:
  1. 学习 AI 底层技术
  2. 理性认识大模型局限
  3. 避免“饭圈化”思维

---

## 5. 结论与 OpenMCP 介绍
### 核心总结
1. 大模型幻觉:不知道自己不知道什么
2. 开发者幻觉:对能力边界的不切实际期望
3. 两者均为 AI Agent 开发的核心障碍

### OpenMCP 项目
- **定位**:一体化 MCP 开发与部署解决方案
- **资源**:
  - [官方站点](https://kirigaya.cn/openmcp)
  - [GitHub](https://github.com/L

<NolebaseGitContributors />


<NolebaseGitChangelog />